SMUS Android Email New: Difference between revisions
Jump to navigation
Jump to search
No edit summary |
No edit summary |
||
| Line 5: | Line 5: | ||
* Choose "Accounts & sync" | * Choose "Accounts & sync" | ||
[[File:2_email_android_tap_accounts.png|200px | [[File:2_email_android_tap_accounts.png|200px]] | ||
* Choose "Add Account" at the bottom of the screen | * Choose "Add Account" at the bottom of the screen | ||
[[File:3_email_android_tap_add_account.png|200px | [[File:3_email_android_tap_add_account.png|200px]] | ||
* Choose "Email" | * Choose "Email" | ||
[[File:4_email_android_tap_email.png|200px | [[File:4_email_android_tap_email.png|200px]] | ||
* Enter your email address and password, then choose "Manual setup" | * Enter your email address and password, then choose "Manual setup" | ||
[[File:5_email_android_tap_manual.png|200px | [[File:5_email_android_tap_manual.png|200px]] | ||
* Choose "Exchange" | * Choose "Exchange" | ||
[[File:6_email_android_tap_exchange.png|200px | [[File:6_email_android_tap_exchange.png|200px]] | ||
* Change the username at the top to "smuslocal\username" and change the server to "exchange2.smus.ca" then choose "Next" | * Change the username at the top to "smuslocal\username" and change the server to "exchange2.smus.ca" then choose "Next" | ||
[[File:7_email_android_tap_next.png|200px | [[File:7_email_android_tap_next.png|200px]] | ||
* Choose "OK" | * Choose "OK" | ||
[[File:8_email_android_tap_ok.png|200px | [[File:8_email_android_tap_ok.png|200px]] | ||
* Set your days to sync to "One week" or longer, check "Send email from this account by default" if desired, then choose "Next" | * Set your days to sync to "One week" or longer, check "Send email from this account by default" if desired, then choose "Next" | ||
[[File:9_email_android_tap_next.png|200px | [[File:9_email_android_tap_next.png|200px]] | ||
* Choose "Activate" | * Choose "Activate" | ||
[[File:10_email_android_tap_activate.png|200px | [[File:10_email_android_tap_activate.png|200px]] | ||
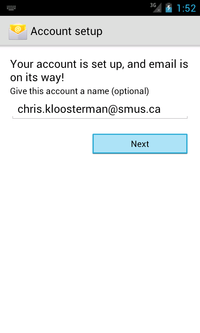
* Choose "Next" | * Choose "Next" | ||
[[File:11_email_android_tap_next.png|200px | [[File:11_email_android_tap_next.png|200px]] | ||
* Run your Email, Calendar, or People apps to use your SMUS data | * Run your Email, Calendar, or People apps to use your SMUS data | ||
[[File:12_email_android_run_email.png|200px | [[File:12_email_android_run_email.png|200px]] | ||
Revision as of 12:45, 24 May 2012
- Tap the settings button on your phone
File:1 email android tap settings.png
- Choose "Accounts & sync"
File:2 email android tap accounts.png
- Choose "Add Account" at the bottom of the screen
File:3 email android tap add account.png
- Choose "Email"
File:4 email android tap email.png
- Enter your email address and password, then choose "Manual setup"
File:5 email android tap manual.png
- Choose "Exchange"
File:6 email android tap exchange.png
- Change the username at the top to "smuslocal\username" and change the server to "exchange2.smus.ca" then choose "Next"
File:7 email android tap next.png
- Choose "OK"
File:8 email android tap ok.png
- Set your days to sync to "One week" or longer, check "Send email from this account by default" if desired, then choose "Next"
File:9 email android tap next.png
- Choose "Activate"
File:10 email android tap activate.png
- Choose "Next"
- Run your Email, Calendar, or People apps to use your SMUS data
