SMUS Android Wifi New: Difference between revisions
Jump to navigation
Jump to search
(Created page with "These instructions cover a stock Android 4.0 phone. If you have an Android tablet or a phone with customized software (some brands come with changes such as HTC Sense), some ...") |
No edit summary |
||
| (One intermediate revision by one other user not shown) | |||
| Line 1: | Line 1: | ||
These instructions cover a stock Android | These instructions cover a stock Android 8.1.0 phone. If you have an Android tablet or a phone with customized software (some brands come with changes such as HTC, LG, and Samsung), some of the settings may be in different locations. | ||
* Tap the settings button | * Tap the settings button | ||
[[File: | [[File:1 Setting icon.png|300px]] | ||
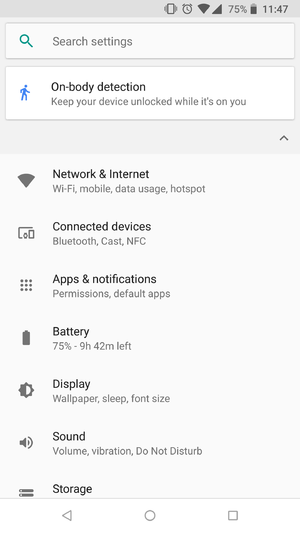
* Tap Network & Internet at the top | |||
[[File:2 Network and internet.png|300px]] | |||
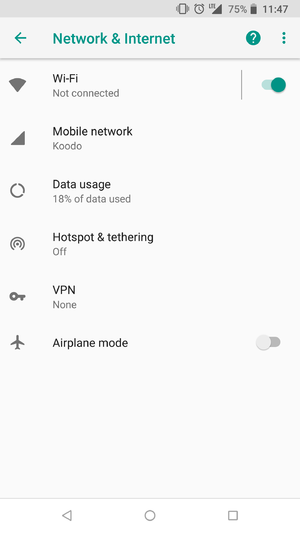
* Tap Wifi at the top | * Tap Wifi at the top | ||
[[File: | [[File:3 Wifi.png|300px]] | ||
* Tap AirSMUS-staff or AirSMUS-student | * Tap AirSMUS-staff or AirSMUS-student | ||
[[File: | [[File:4 airsmus.png|300px]] | ||
* Change "Phase 2 Authentication" to MSCHAPV2 | * Change "Phase 2 Authentication" to MSCHAPV2 | ||
* Change "CA certificate" to Do not validate | |||
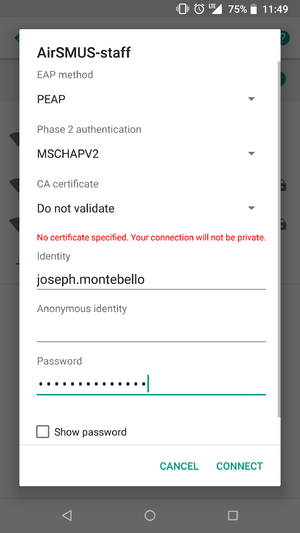
* Fill in your identity (username) and password (You may have to scroll further down), then tap Connect | |||
[[File: | [[File:5 wifi mschapv2 user and pass.png|300px]] | ||
Latest revision as of 09:07, 13 February 2018
These instructions cover a stock Android 8.1.0 phone. If you have an Android tablet or a phone with customized software (some brands come with changes such as HTC, LG, and Samsung), some of the settings may be in different locations.
- Tap the settings button
- Tap Network & Internet at the top
- Tap Wifi at the top
- Tap AirSMUS-staff or AirSMUS-student
- Change "Phase 2 Authentication" to MSCHAPV2
- Change "CA certificate" to Do not validate
- Fill in your identity (username) and password (You may have to scroll further down), then tap Connect


